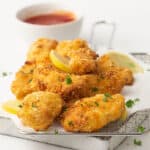
Air Fryer Chicken Nuggets
These healthier Chicken Nuggets in the Air Fryer are tender and moist in the centre with a crispy crunchy crumb on the outside.
Servings 2 people
Calories 407kcal
Equipment
- Air Fryer
Ingredients
- ⅔ pound chicken breasts, (300 grams)
- 2 large eggs
- ¼ cup Panko breadcrumbs
- ¼ cup Shredded parmesan cheese
- ¼ cup Regular Breadcrumbs (wholemeal, golden or cornflake)
- 3 tablespoons all-purpose or plain flour
- ½ teaspoon Sea salt
- ¼ teaspoon Garlic powder
- ¼ teaspoon Onion powder
- spray oil
Instructions
- Slice the chicken breasts into chicken small chunks. This will yield roughly 10 to 12 chicken nuggets.
- Organise three separate bowls to be your "Dipping Station"; place flour, salt, garlic powder and onion powder into the first bowl. Place eggs into the second bowl and whisk. Place panko breadcrumbs, shredded parmesan cheese and breadcrumbs into the third bowl.
- Using tongs, taking one piece of chicken at a time, dip and coat in the flour mixture, then the egg mixture, then finally the breadcrumb mixture. Repeat the process until or chicken pieces are coated.
- Lay out the nuggets in the air fryer tray in a single layer trying not to overlap them and spray generously with spray oil.
- Cook on 400°F (200°C) for 13-14 minutes turning over at 7 minutes. Ensure the chicken nuggets reach in internal temperature of 165°F/75°C.
- Once they are ready, take out of the air fryer and serve immediately with your favourite dipping sauces.
Notes
- Chicken: Skinless chicken breasts are ideal, and you’ll need two regular sized ones for this recipe (about 300 grams or 10 ½ ounces)
- Flour: The flour is the preparation layer which allows the egg to stay on the chicken. Ideally a fine flour is best, such as all purpose, plain, or if you’re in Australia, you could use self raising flour at a pinch.
- Eggs: Eggs are used to make the egg wash which is what helps the breadcrumbs to stick to the chicken. If you’re short on eggs, instead of using two, you could use 1 egg, wisked together with some milk.
- Breadcrumb 1 - Panko Breadcrumbs: These are a Japanese breadcrumb that has a lot more texture than regular breadcrumbs and is perfect for breading. With a light spray of oil it crisps up very nicely to create a crunchy exterior. Panko breadcrumbs are usually found in the aisle with the spices and if you are unable to find them, using whole meal breadcrumbs is a good substitute.
- Breadcrumb 2 – Wholemeal, Golden or Cornflake: I love using two different types of breadcrumbs when breeding chicken as it helps to ensure the chicken is coated properly. Because panko crumbs are larger ad rougher, combining them with a smaller and finer breadcrumb works well to ensure the chicken is well coated with different textures to create a delightful crispy and crunchy coating.
- Parmesan: For convenience I tend to buy the shaved parmesan as this provides a good texture and adds to the crispiness. You don’t want shaved parmesan that is too soft as it will loose its texture and blend into much . A good hard and sharp store bought parmesan works great.
- Garlic Powder/Onion Powder: These add flavour to the chicken. Using both is ideal, however you could also use just one or the other. Additionally feel free to add in other herbs like dried oregano, dried basil, dried chives, dried rosemary or thyme.
Nutrition
Calories: 407kcal | Carbohydrates: 25g | Protein: 45g | Fat: 13g | Saturated Fat: 4g | Fiber: 1g